zIf you're a coffee enthusiast who dreams of mastering espresso at home, you’ve likely heard of Breville or Sage espresso machines. These machines are celebrated for their user-friendly design and versatility, making them a popular choice for home baristas. One of the challenges you’ll encounter as you fine-tune your espresso-making skills is using the single basket for a single shot. While it may seem straightforward, achieving the perfect single shot can be surprisingly tricky due to the unique nature of the single basket. If you’re looking to unlock the full potential of your Breville or Sage espresso machine, understanding the quirks of the single basket and how to approach it will elevate your brewing game. Get a detailed look at the precision and features in our Breville Dual Boiler BES920XL review
Let’s dive into how you can master the single basket, troubleshoot common issues, and turn your espresso into a true masterpiece. Learn about the sleek design and functionality in our Breville Barista Touch Impress review
Understanding the Single Basket
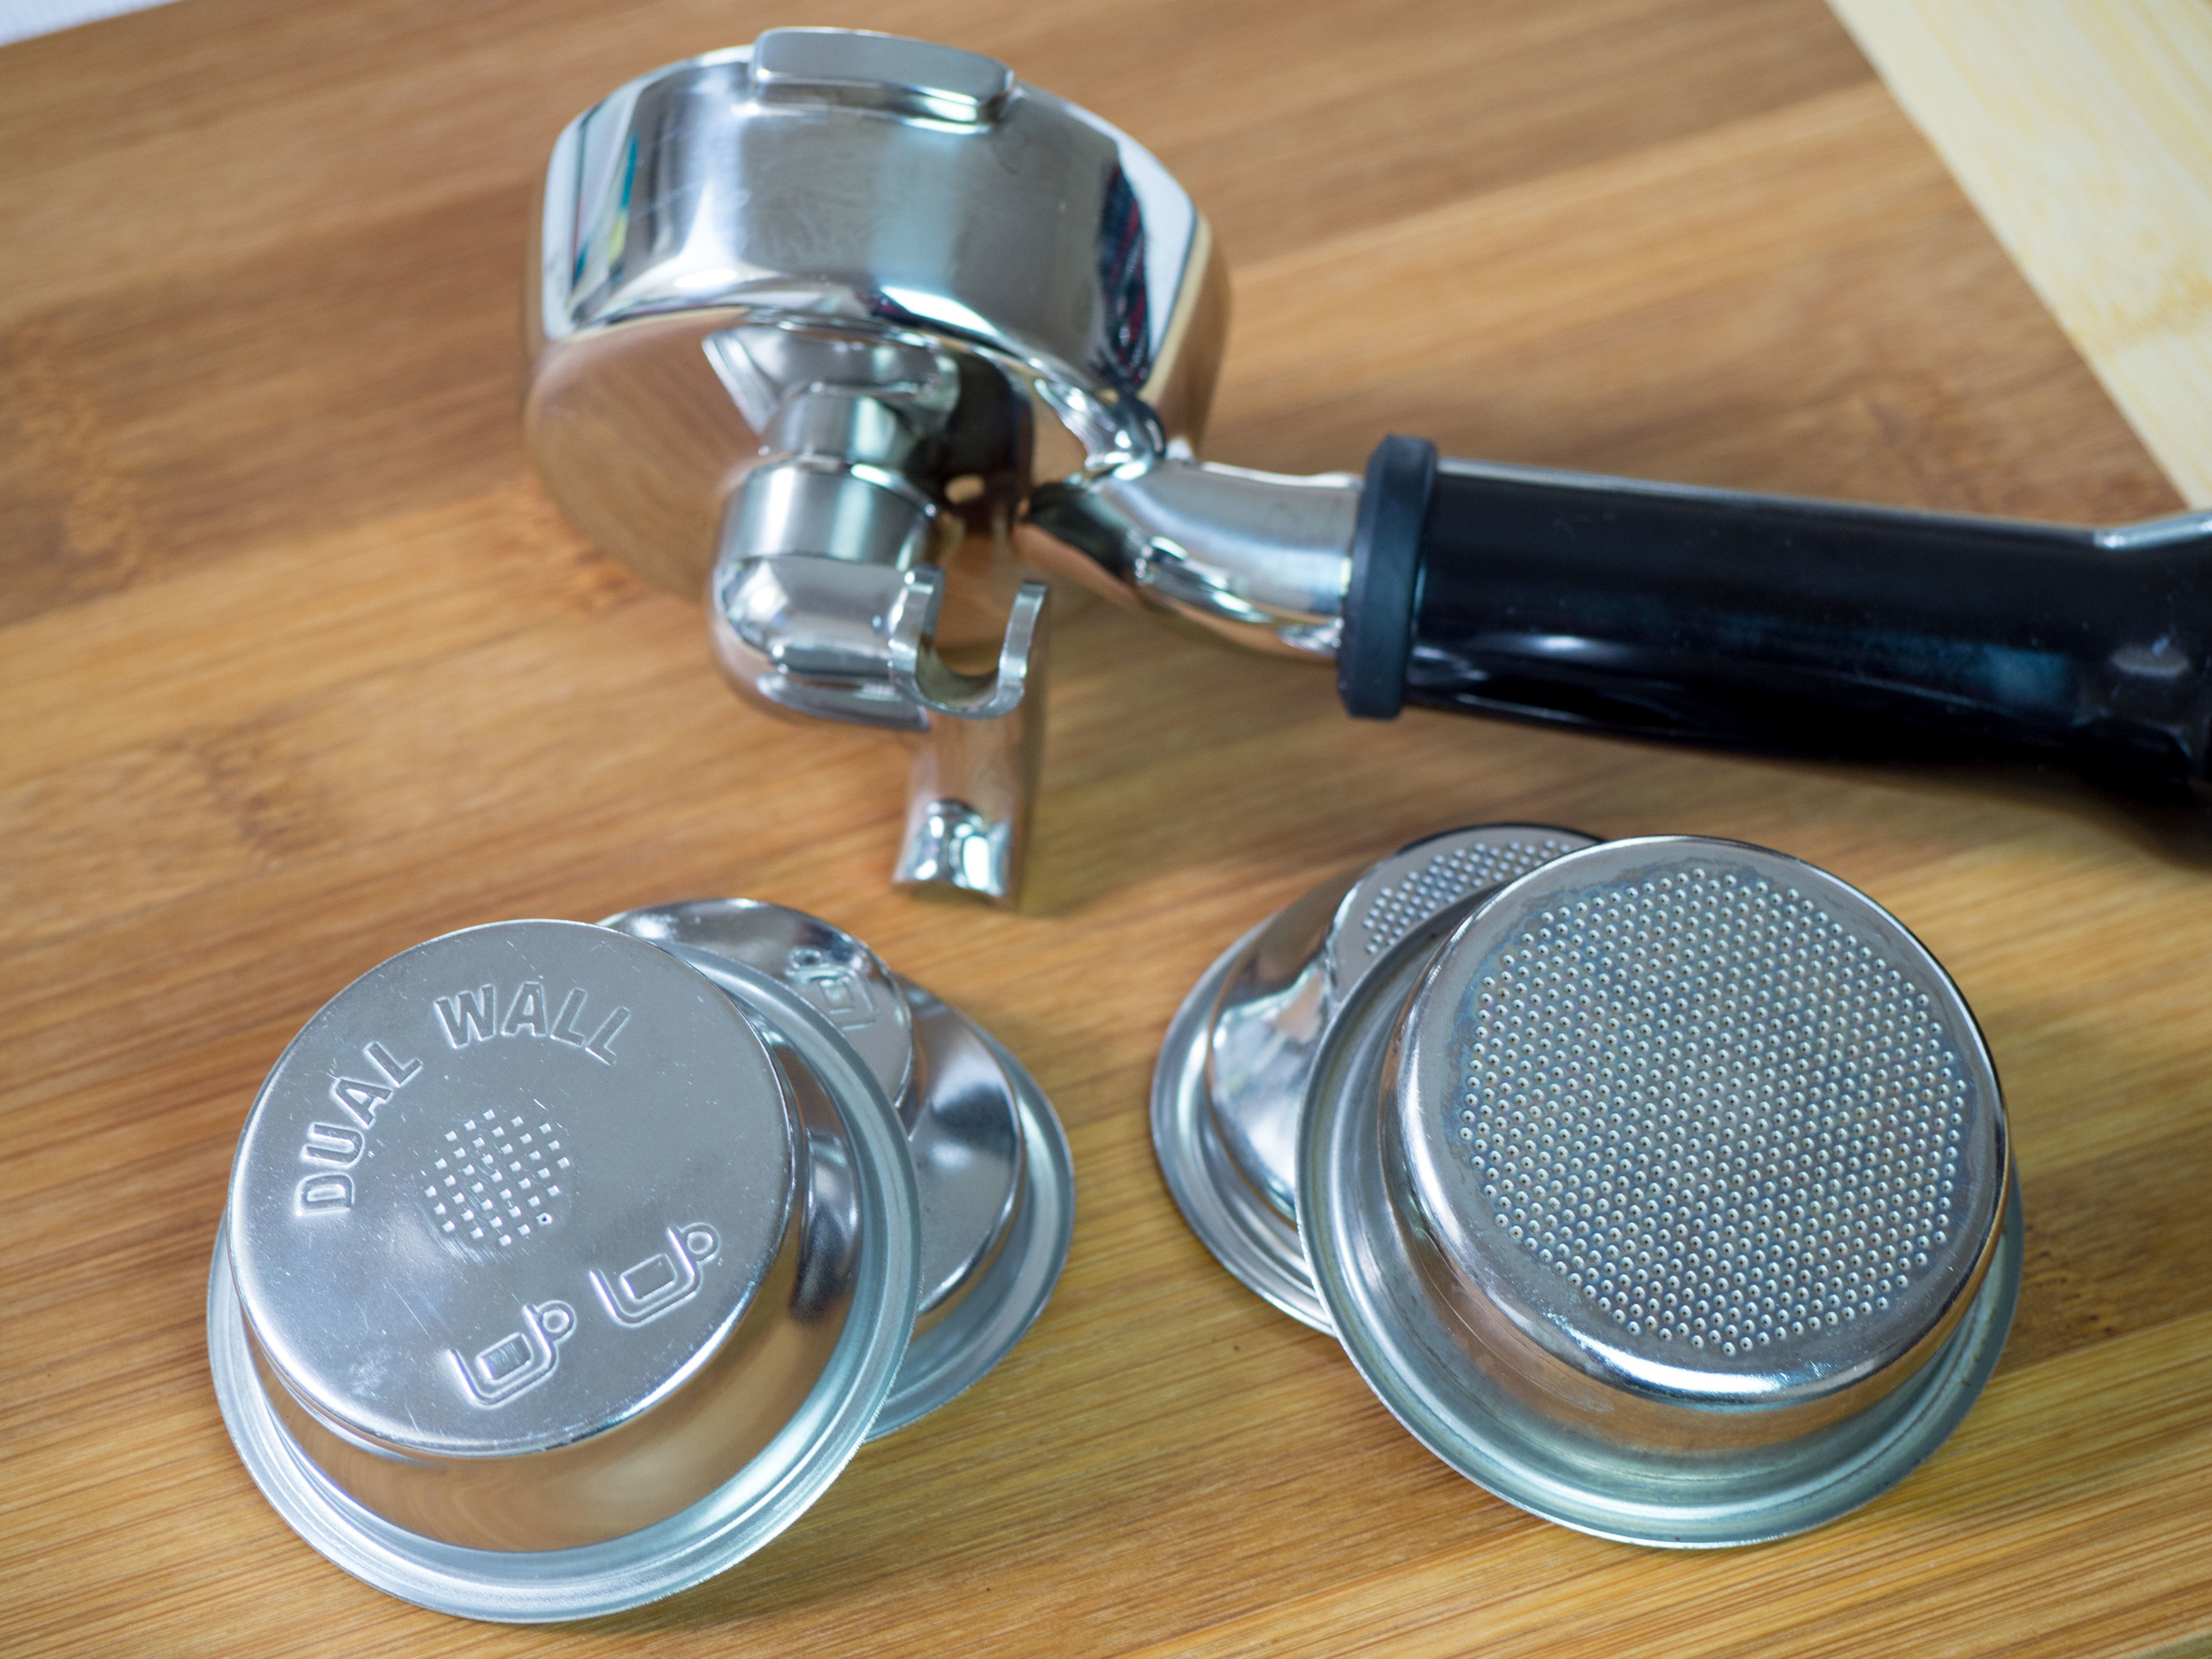
When you first open the box of your Breville or Sage espresso machine, you’ll find two filter baskets in the portafilter: a single and a double. While the double basket tends to yield more reliable results, the single basket—while offering fewer coffee grounds—has a unique conical design that can be more challenging. Here’s why:
The Conical Difference
The single basket’s conical shape is designed to focus the flow of water, but it also introduces a potential problem: uneven pressure. Unlike the double basket, which has a more even flow due to its larger surface area, the single basket’s narrow bottom can lead to channeling. Channeling occurs when water flows through certain areas of the coffee puck more quickly than others, causing an uneven extraction. The result? A shot that might be under-extracted in some places and over-extracted in others. Compare performance and usability in our Breville Barista Express Impress vs Pro review
For the single shot to rival a double, you need to adjust your technique to account for the differences in shape, pressure, and flow. Understanding these nuances is key to creating a single shot that is rich, balanced, and full of flavor. Discover the key differences between these two models in our Breville Barista Pro vs Express review
Tools You’ll Need for Success
To set yourself up for success in brewing the perfect single shot, you’ll need a few essential tools. These will help you control the crucial variables like dose, grind, tamp, and extraction time. Explore the advanced capabilities in our Breville Oracle vs Oracle Touch review
1. Coffee Scale: Precision Matters
The most reliable way to measure your coffee input and output is with a coffee scale. A scale will allow you to weigh both the grounds and the resulting espresso shot to ensure consistency in every brew. This is crucial for dialing in your espresso.
Highly Rated Option on Amazon: Felicita Arc Espresso Scale
This scale is known for its accuracy and sleek design. It offers precise measurements, which is particularly important when making single shots, as the margin for error is smaller compared to double shots.
2. Burr Grinder: Consistency is Key
A burr grinder is a must for any espresso enthusiast. Unlike blade grinders, burr grinders ensure a consistent grind size, which is critical for extracting the best flavors from your coffee. For single shots, a fine and uniform grind is essential to counteract the uneven pressure caused by the conical shape of the single basket.
Popular Choice: Baratza Encore Conical Burr Grinder
This grinder is an excellent choice for home espresso brewing. It’s consistent, easy to use, and affordable for those looking to elevate their coffee without breaking the bank.
3. Tamper: Even Pressure for Even Extraction
A good tamper is crucial for ensuring that your coffee grounds are evenly compressed into the portafilter. An uneven tamp can lead to channeling, which in turn results in poor extraction. A calibrated tamper ensures that you apply consistent pressure every time, which is particularly important when working with the single basket.
Recommendation: Espro Calibrated Tamper
This tamper provides even pressure with each tamp, ensuring that your coffee puck is perfectly flat and even, helping to reduce the risk of channeling.
4. Distribution Tool: Level Grounds for Better Shots
Some espresso enthusiasts recommend using a distribution tool to spread the coffee grounds evenly in the portafilter before tamping. This tool can be particularly helpful when using the single basket to avoid uneven extraction.
Recommended Product: Normcore WDT Tool for Espresso
This distribution tool helps evenly distribute coffee grounds, reducing the chances of channeling and helping to achieve a more even extraction.
Steps to Perfecting the Single Basket
Brewing a perfect single shot with a Breville or Sage espresso machine requires precision. Here’s a step-by-step guide to perfecting your technique.
1. Adjust Your Coffee Dose
The first key step to brewing a perfect single shot is adjusting your dose. For a single shot, aim for around 10 grams of coffee. Many beginners mistakenly try to halve the dose of a double shot, but the single basket’s smaller size actually benefits from a slightly higher dose—about 10 grams instead of 9. This helps provide a better resistance and a fuller flavor profile, balancing out the nuances of the single basket.
2. Fine-Tune Your Grind Size
Since the single basket is smaller, it requires a finer grind than the double basket. A finer grind will slow down the water flow and ensure that extraction is even and complete. If your grind is too coarse, the water will flow through the puck too quickly, resulting in an under-extracted, weak shot.
Start with a grind size that’s slightly finer than what you’d use for a double shot and adjust from there based on taste and shot time.
3. Purge Your Grinder
Before you switch from brewing double shots to single shots, always purge your grinder by grinding out a few grams of coffee. This helps to prevent any leftover grounds from the double shot (which may have a different grind size) from affecting your single shot. Consistent grind size is key to ensuring a balanced extraction and a well-rounded shot.
4. Use the 1:2 Brew Ratio
Once you’ve dialed in your dose and grind size, aim for a 1:2 brew ratio. This means that for every gram of coffee, you’ll want approximately two grams of espresso in your cup. For example, if you use 10 grams of coffee, aim for 20 grams of liquid espresso.
This ratio strikes a good balance between under-extraction (too weak) and over-extraction (too bitter). It will help you achieve a balanced, flavorful shot every time.
Troubleshooting Common Issues
Even with the right tools and technique, things don’t always go as planned. Here are some common problems you might encounter when brewing single shots and how to solve them.
1. Watery or Sour Shots
If your shot tastes watery or sour, the grind is probably too coarse. A coarse grind allows the water to flow through the puck too quickly, resulting in under-extraction. To fix this, simply adjust your grinder to a finer setting and try again.
2. Bitter or Overly Strong Shots
If your shot tastes bitter or too strong, you may be experiencing over-extraction. This happens when water stays in contact with the coffee grounds for too long. To resolve this, try reducing the dose slightly or pulling a shorter shot. A 1:1.5 ratio may work better for some beans and can help you avoid overly bitter shots.
3. Channeling (Uneven Extraction)
Channeling is one of the most common problems with the single basket due to its conical shape. If your tamp is uneven or your grounds are distributed poorly, water may find a channel through which it flows too quickly, resulting in an uneven shot.
To prevent channeling, ensure your puck is level before tamping, apply consistent pressure with your tamper, and consider using a distribution tool to ensure even grounds.
The Role of Pre-Infusion
Many Breville and Sage espresso machines offer a feature called pre-infusion. This involves a brief period where a small amount of water is applied to the coffee grounds before full pressure is exerted. Pre-infusion is particularly useful for single shots, as it helps to saturate the puck evenly and reduces the risk of channeling.
Experiment with pre-infusion settings to find the best balance for your espresso, as this can dramatically improve the quality of your shot.
Experiment with Coffee Beans
When using the single basket, you may find that certain beans work better than others. For beginners, medium to dark roasts tend to be more forgiving, as they have a more robust flavor profile that’s less prone to subtle mistakes.
Popular Coffee Recommendations
- Medium Roast: Lavazza Super Crema
This medium roast offers a rich, smooth flavor with a hint of nuttiness and sweetness—perfect for single shots. - Dark Roast: Death Wish Coffee Co. Dark Roast
If you prefer something bolder, Death Wish Coffee provides a dark roast with a robust and intense flavor, perfect for a concentrated single shot.
Maintenance Is Key
To keep your Breville or Sage espresso machine running smoothly, regular cleaning and maintenance are essential.
Clean Equipment Regularly
After each brew, clean your portafilter and basket to remove any residual coffee oils and grounds. These can interfere with the flavor of your espresso over time. Additionally, be sure to descale your machine periodically to maintain optimal performance.
Replace Worn Accessories
Parts like your tamper, portafilter basket, and even your espresso machine’s seals can wear out over time. Regularly inspect your equipment and replace accessories when needed to ensure consistent results.
Advanced Techniques to Try
Once you’ve mastered the basics of brewing a single shot, there are a few advanced techniques you can experiment with to refine your skills further.
1. Temperature Surfing
Temperature stability is crucial for espresso extraction. Some machines allow you to adjust the brewing temperature, and experimenting with small changes in temperature can help fine-tune the flavor profile of your shot.
2. Milk-Based Drinks
If you enjoy lattes or cappuccinos, the single shot can be the perfect base. Since the single shot is more concentrated, it pairs wonderfully with milk, offering a smooth, balanced flavor profile in your favorite espresso drinks.
Recommended Milk Frother: Breville Milk Cafe Frother
This milk frother delivers creamy microfoam, ideal for creating lattes, cappuccinos, or flat whites with your single shot of espresso.
3. Add-On Accessories
Consider experimenting with accessories like a bottomless portafilter or dosing funnels to improve your technique and ensure more accurate dosing and extraction.
Bottomless Portafilter: Breville Bottomless Portafilter
A bottomless portafilter allows you to see the extraction process and provides feedback on the evenness of your tamp, helping you improve your shots over time.
Why Stick with the Single Basket?
Despite its challenges, the single basket offers a rewarding experience for coffee lovers. A well-executed single shot is clean, concentrated, and perfectly suited to those who prefer lighter, more nuanced flavors. Mastering it not only improves your skills but also deepens your understanding of the espresso-making process.
Final Thoughts
Using a single basket with your Breville or Sage espresso machine may seem daunting at first, but with the right technique and tools, you can achieve excellent results. Adjust your dose, fine-tune your grind, and apply consistent pressure during tamping to avoid common issues like channeling or over-extraction.
And remember, coffee brewing is an art as much as it is a science. So, experiment, learn from each shot, and most importantly, enjoy the process. Perfecting your single shots will bring you one step closer to becoming the ultimate home barista. Happy brewing!
Frequently Asked Questions (FAQ)
1. What’s the difference between using a single basket and a double basket on my Breville or Sage espresso machine?
The primary difference between the single and double baskets is the amount of coffee grounds they hold and the size of the shot they produce. A double basket typically requires around 18–20 grams of coffee grounds and yields a double shot of espresso, which is a more consistent and forgiving method for beginners. On the other hand, a single basket holds about 9–10 grams of coffee grounds and produces a single shot of espresso. While the single basket offers a more concentrated shot, it’s trickier to master due to its conical design, which can lead to channeling and uneven extraction if not managed properly.
2. How do I avoid channeling when using the single basket?
Channeling happens when water finds easier paths through the coffee puck, often due to uneven tamping or distribution of coffee grounds. To avoid channeling:
- Use a distribution tool (like the Normcore WDT Tool for Espresso) to ensure even distribution of the coffee grounds in the portafilter.
- Always level your puck before tamping to ensure the coffee grounds are evenly compressed.
- Use a calibrated tamper to apply consistent pressure (such as the Espro Calibrated Tamper).
- Consider using the pre-infusion feature on your machine, which wets the grounds evenly before the full pressure is applied.
3. What’s the ideal grind size for a single shot?
For a single shot of espresso, you need a finer grind than what you would use for a double shot. The grind should be fine enough to slow the flow of water but not so fine that it clogs the filter. A grind that resembles table salt is usually a good starting point. You'll want to fine-tune the grind depending on your specific machine and the coffee you're using. If your shots are coming out too quickly, you may need a finer grind, and if they're coming out too slowly or are bitter, you might need to coarsen it slightly.
4. How much coffee should I use for a single shot?
For a single shot, you typically want to use about 10 grams of coffee. This is slightly more than half the amount you’d use for a double shot (which typically requires around 18–20 grams). Using a slightly higher dose helps ensure a richer flavor and better resistance during extraction, which can compensate for the single basket’s smaller size.
5. Can I use light roast coffee in the single basket?
Light roasts tend to be more acidic and require precise control of your grind size, tamping pressure, and extraction time to avoid sourness or under-extraction. While medium to dark roasts are generally easier to work with in the single basket due to their robust flavor profiles, you can certainly use light roast coffee—just be prepared to experiment with your grind size and extraction time to get the best flavor. Light roasts can be more challenging to pull a great single shot from, but they can also yield bright, complex flavors when done right.
6. What is pre-infusion, and should I use it when making a single shot?
Pre-infusion is a process in which a small amount of water is applied to the coffee grounds at low pressure before the full extraction begins. This helps to evenly saturate the grounds and reduces the chances of channeling. Pre-infusion is especially helpful when using the single basket since it can mitigate uneven extraction caused by the narrow design. If your Breville or Sage espresso machine offers pre-infusion, it’s a good idea to experiment with this feature to see if it improves the consistency of your single shots.
7. Why does my single shot taste sour or watery?
If your single shot tastes sour or watery, it’s often due to under-extraction. The most common reasons for under-extraction are:
- Grind too coarse: When the grind is too coarse, the water flows through the grounds too quickly, leading to weak, sour shots. Try adjusting your grinder to a finer setting.
- Too little coffee: If you’re using less than the recommended 10 grams of coffee, you may not get the necessary resistance for a full extraction. Stick to around 10 grams for the best results.
8. Why does my single shot taste bitter or overly strong?
Bitterness is usually a sign of over-extraction, which occurs when the water stays in contact with the coffee for too long. If your shot tastes bitter or overly strong, consider the following:
- Grind too fine: A grind that’s too fine will slow the flow of water too much, resulting in over-extraction. Try adjusting the grind to a slightly coarser setting.
- Overly long extraction: If your shot is pulling for more than 30 seconds, it might be extracting too much. Try adjusting your shot time by reducing the dose or using a slightly coarser grind.
- Too much coffee: If you’re using more than 10 grams of coffee, try reducing your dose slightly.
9. Should I use the single basket for milk-based drinks?
Yes, the single basket can be ideal for milk-based drinks like lattes or cappuccinos, especially if you prefer a more concentrated espresso flavor. A single shot pairs beautifully with steamed milk, giving you a smooth and balanced drink. Since the shot is more concentrated, it works well with the creaminess of milk without being overwhelmed by it.
To make the most of your single shot in milk-based drinks, you’ll want to steam the milk to a creamy microfoam. A milk frother like the Breville Milk Cafe Frother can help you achieve the perfect texture for lattes and cappuccinos.
10. What are the best coffee beans for a single shot of espresso?
For a single shot, it’s typically better to use medium or dark roasts, as they are more forgiving and provide a richer, fuller flavor profile. Beans that are too light or acidic can be tricky for a single shot, as they require more precise technique and often lead to sourness or under-extraction.
Here are some popular options:
- Lavazza Super Crema (medium roast): Known for its smooth and balanced profile, it’s a great choice for espresso.
- Death Wish Coffee Co. Dark Roast (dark roast): Offers a bold, rich flavor with low acidity, making it a good fit for single-shot espresso.
11. Can I use the single basket for decaf espresso?
Yes, you can use the single basket for decaf espresso, but keep in mind that decaffeinated coffee often has slightly different extraction characteristics than regular coffee. Decaf beans can sometimes be less dense and may require a slightly finer grind or a higher dose to get a good shot. Like regular beans, decaf will also benefit from a consistent tamp and the use of pre-infusion if your machine allows it.
12. How do I clean my Breville or Sage espresso machine after using the single basket?
Regular maintenance is crucial to ensure your espresso machine performs at its best. Here’s a basic cleaning routine:
- After each shot, discard the used grounds and rinse the portafilter and basket under warm water.
- Use a brush to clean the portafilter and the group head to remove any residual coffee grounds.
- Descale the machine every 1-2 months to remove mineral buildup from the water. Follow the manufacturer’s instructions for descaling your machine.
- Make sure to wipe down the steam wand after every use to prevent milk buildup.
By following these steps, you’ll help maintain the longevity of your machine and ensure consistently great espresso shots.
13. Can I get the same results with a cheap grinder?
While it’s possible to make decent espresso with a less expensive grinder, quality is key. A cheap grinder might produce inconsistent grinds, which can affect the extraction process and lead to uneven shots. Investing in a burr grinder like the Baratza Encore Conical Burr Grinder will help ensure that your grinds are consistent, leading to better espresso shots and a more enjoyable coffee experience overall.